【Laravelチュートリアル】 STEP4 Modelを使ってデータを登録しよう。
前の章でテストデータを用意しました。
この章では、実際にデータを表示し登録していきます。このように一覧、新規作成、編集、削除のすべての流れを実装する際は、一覧→新規作成→編集→削除の順で実装していくと良いでしょう。
一覧を表示するためのデータがない場合は、新規作成から実装しましょう。
1.一覧表示
ここから、前の章で学んだことをすべて利用していきますのでわからないことがあれば前の章を復習しましょう。
PostContoller.phpを修正します。
// app/Http/Controllers/PostController.php
<?php

namespace App\Http\Controllers;

use App\Models\Post;
use Illuminate\Http\Request;

class PostController extends Controller
{
    //
    public function index()
    {
        $posts = Post::all();

        return view('post.index', [
            'posts' => $posts
        ]);
    }
}
viewにデータを渡す場合は、配列にして渡します。
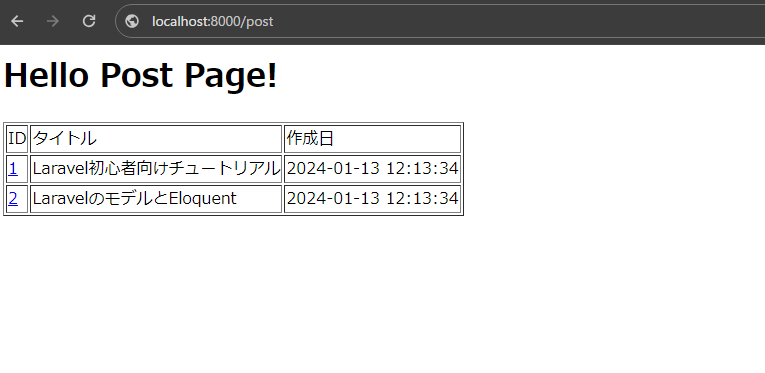
// resources/views/post/index.blade.php
<h1>Hello Post Page!</h1>

<table class="table" border="1">
    <thead>
    <tr>
      <td>ID</td>
      <td>タイトル</td>
      <td>作成日</td>
    </tr>
    </thead>
    <tbody>
        {{-- posts配列をループして、投稿記事の情報を表示 --}}
        @foreach ($posts as $post)
            <tr>
                <td><a href="#">{{ $post->id }}</a></td>
                <td>{{ $post->title }}</td>
                <td>{{ $post->created_at }}</td>
            </tr>
        @endforeach
    </tbody>
</table>
2.新規作成画面
まずControllerに新規作成の画面表示の処理を追加する
// app/Http/Controllers/PostController.php
<?php

namespace App\Http\Controllers;

use App\Models\Post;
use Illuminate\Http\Request;

class PostController extends Controller
{
    // 省略..

    /**
     * 新規作成
     */
    public function create()
    {
        return view('post.create');
    }
}
// resources/views/post/create.blade.php
<h1>投稿新規作成</h1>

<form action="{{ route('post.create') }}" method="post">
    @csrf
    <div>
        <label for="">タイトル</label>
        <input type="text" name="title">
    </div>
    <div>
        <label for="">記事</label>
        <textarea name="content"></textarea>
    </div>

    <button type="submit">作成</button>
</form>
// routes/web.php
// 省略...

Route::get('/post', [PostController::class, 'index'])->name('post.index');
Route::get('/post/create', [PostController::class, 'create'])->name('post.create');画面を作成する場合、ControllerとRoute、Viewを追加します。
ここでルートに名前(name)を追加します。
nameを追加するとroute('post.create')のように呼び出すことができます。呼び出すとhttp://localhost:8000/post/createがHTML上で表示されます。
一覧ページに新規作成のリンクを設置する
<h1>Hello Post Page!</h1>

<a href="{{ route('post.create') }}">新規作成</a>

<table class="table" border="1">
    <thead>
    <tr>
      <td>ID</td>
      <td>タイトル</td>
      <td>作成日</td>
    </tr>
    </thead>
    <tbody>
        {{-- posts配列をループして、投稿記事の情報を表示 --}}
        @foreach ($posts as $post)
            <tr>
                <td><a href="#">{{ $post->id }}</a></td>
                <td>{{ $post->title }}</td>
                <td>{{ $post->created_at }}</td>
            </tr>
        @endforeach
    </tbody>
</table>
3.新規登録の処理
次に登録処理を追加します。
// app/Http/Controllers/PostController.php
<?php

namespace App\Http\Controllers;

use App\Models\Post;
use Illuminate\Http\Request;

class PostController extends Controller
{
    // ...省略

    /**
     * 新規登録
     *
     * @param Request $request
     */
    public function store(Request $request)
    {
        Post::create([
            'title' => $request->input('title'),
            'content' => $request->input('content'),
        ]);

        return redirect()->route('post.index');
    }
}
// routes/web.php
<?php
// ...省略
Route::post('/post/create', [PostController::class, 'store']);redirect()->route('post.index');は、登録後に一覧ページに戻る処理です。
作成処理自体はSeederとほとんど変わりません。
ルートの設定で今回はPOSTで登録します。/post/createがGETとPOSTがある場合は、POSTの方にnameは不要です。
これはURLは一緒でmethod(メソッド)だけが違うためです。
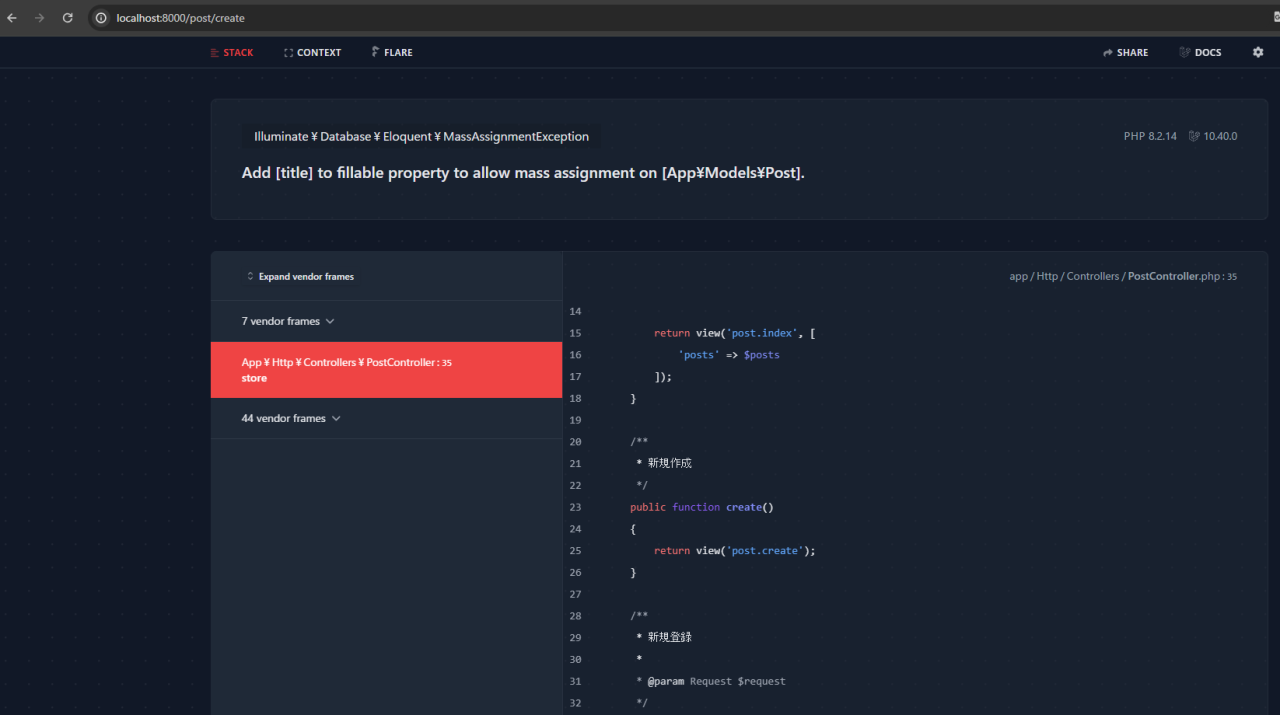
実際に新規登録画面で入力して、「作成」を押してみましょう。

このようにエラーが出るでしょう。
これは、タイトルと記事の内容は必須項目になっているためNULL(型のデータ)は登録できません。
このようにユーザーのデータ入力を規制する場合は、バリデーションを利用する必要があります。
// app/Http/Controllers/PostController.php
<?php

namespace App\Http\Controllers;

use App\Models\Post;
use Illuminate\Http\Request;

class PostController extends Controller
{
    // ..

    /**
     * 新規登録
     *
     * @param Request $request
     */
    public function store(Request $request)
    {
        $request->validate([
            'title' => 'required|max:150',
            'content' => 'required'
        ]);

        Post::create([
            'title' => $request->input('title'),
            'content' => $request->input('content'),
        ]);

        return redirect()->route('post.index');
    }
}
requiredは、必須項目を表します。max:150は、上限150文字まで入力可能になります。
そして、バリデーションの結果を表示します。
// resources/views/post/create.blade.php
@extends('layouts.app')

@section('content')
<h1>投稿新規作成</h1>

<form action="{{ route('post.create') }}" method="post">
    @csrf
    <div class="mb-3">
        <label class="form-label">タイトル</label>
        <input type="text" name="title" value="{{ old('title') }}" class="form-control">
        @error('title')
            <div>{{ $message }}</div>
        @enderror
    </div>
    <div class="mb-3">
        <label class="form-label">記事</label>
        <textarea name="content" class="form-control">{{ old('content') }}</textarea>
        @error('content')
            <div>{{ $message }}</div>
        @enderror
    </div>

    <button type="submit" class="btn btn-primary">作成</button>
</form>
@endsection
oldも追加しました。一時保持データーとして保存されている直前の入力値を取得します。これがないとバリデーション後に画面に戻ってきた場合に入力したデータがリセットされてしまいます。
@error('title')は、titleに対してのバリデーションメッセージを表示するときに用います。
4.編集画面
次に編集画面を作成します。
// app/Http/Controllers/PostController.php
<?php

namespace App\Http\Controllers;

use App\Models\Post;
use Illuminate\Http\Request;

class PostController extends Controller
{
    // ...

    /**
     * 編集
     *
     * @param string $id
     * @return View
     */
    public function edit($id)
    {
        $post = Post::find($id);

        return view('post.edit', [
            'post' => $post
        ]);
    }
}
// resources/views/post/edit.blade.php
<h1>{{ $post->title }} 編集</h1>

<form action="{{ route('post.edit', ['id' => $post->id]) }}" method="post">
    @csrf
    <div>
        <label for="">タイトル</label>
        <input type="text" name="title" value="{{ old('title', $post->title) }}">
        @error('title')
            <div>{{ $message }}</div>
        @enderror
    </div>
    <div>
        <label for="">記事</label>
        <textarea name="content">{{ old('content', $post->content) }}</textarea>
        @error('content')
            <div>{{ $message }}</div>
        @enderror
    </div>

    <button type="submit">更新</button>
</form>
// routes/web.php
// ...
Route::get('/post/{id}', [PostController::class, 'edit'])->name('post.edit');oldは初期値を設定することができます。初期値を設定してしまえば編集画面は完了です。
今回は、新規登録と編集画面の項目が一緒なので簡単でしたね。
actionの値も変わっているので注意してください。
一覧にリンクを作成します。
// resources/views/post/index.blade.php
<h1>Hello Post Page!</h1>

<a href="{{ route('post.create') }}">新規作成</a>

<table class="table" border="1">
    <thead>
    <tr>
      <td>ID</td>
      <td>タイトル</td>
      <td>作成日</td>
      <td></td>
    </tr>
    </thead>
    <tbody>
        {{-- posts配列をループして、投稿記事の情報を表示 --}}
        @foreach ($posts as $post)
            <tr>
                <td><a href="{{ route('post.edit', ['id' => $post->id]) }}">{{ $post->id }}</a></td>
                <td>{{ $post->title }}</td>
                <td>{{ $post->created_at }}</td>
                <td><a href="{{ route('post.edit', ['id' => $post->id]) }}">編集</a></td>
            </tr>
        @endforeach
    </tbody>
</table>
5.更新処理
更新処理もほとんど一緒です。
// app/Http/Controllers/PostController.php
<?php

namespace App\Http\Controllers;

use App\Models\Post;
use Illuminate\Http\Request;

class PostController extends Controller
{
    // ...

    /**
     * 更新処理
     *
     * @param Request $request
     * @param string $id
     * @return Response
     */
    public function update(Request $request, $id)
    {
        $post = Post::find($id);

        $request->validate([
            'title' => 'required|max:150',
            'content' => 'required'
        ]);

        $post->update([
            'title' => $request->input('title'),
            'content' => $request->input('content'),
        ]);

        return redirect()->route('post.index');
    }
}
// routes/web.php
// ...
Route::post('/post/{id}', [PostController::class, 'update']);
6.削除処理
削除処理は、作成より単純です。
// app/Http/Controllers/PostController.php
<?php

namespace App\Http\Controllers;

use App\Models\Post;
use Illuminate\Http\Request;

class PostController extends Controller
{
    // ...
    /**
     * 削除処理
     *
     * @param Request $request
     * @param string $id
     * @return Response
     */
    public function destroy(Request $request, $id)
    {
        $post = Post::find($id);

        $post->delete();

        return redirect()->route('post.index');
    }
}
// routes/web.php
// ...
Route::get('/post/{id}/delete', [PostController::class, 'destroy'])->name('post.destroy');
あとは、一覧にリンクを付ければ終わりです。
// resources/views/post/index.blade.php
<h1>Hello Post Page!</h1>

<a href="{{ route('post.create') }}">新規作成</a>

<table class="table" border="1">
    <thead>
    <tr>
      <td>ID</td>
      <td>タイトル</td>
      <td>作成日</td>
      <td></td>
    </tr>
    </thead>
    <tbody>
        {{-- posts配列をループして、投稿記事の情報を表示 --}}
        @foreach ($posts as $post)
            <tr>
                <td><a href="{{ route('post.edit', ['id' => $post->id]) }}">{{ $post->id }}</a></td>
                <td>{{ $post->title }}</td>
                <td>{{ $post->created_at }}</td>
                <td>
                    <a href="{{ route('post.edit', ['id' => $post->id]) }}">編集</a>
                    <a href="{{ route('post.destroy', ['id' => $post->id]) }}">削除</a>
                </td>
            </tr>
        @endforeach
    </tbody>
</table>
7.お役立ち情報
新規作成は、createと更新はeditなどの基本的なデータ登録、更新、削除には決まった名前を付けましょう。
迷ったら以下のテーブルを参考にしましょう。
今回の章では削除の処理の動詞(method)はGETになっています。
DELETEやPUTなどGET、POST以外の場合Javascriptなどを利用しないとアクセスができません。なので今回はGETで代用しています。
8.まとめ
今回でController、Route、ModelのMVCの基本を理解できたと思います。ここで不明な点とかある場合は、前の章に行き復習しましょう。MVCを理解できれば言語やフレームワークが変わってもある程度対応することができようになります。
次の章では、デザインとBladeの機能を理解しましょう。